About this guide
In this guide, we will look at creating attacks and modifying animation notifiers in the animation montages used by attacks. This guide will not go through how to set up attacks in the ItemTable or how to create animations. This guide is also quite long and involved and we will keep it as up to date as we can, as pieces of information might be missing.
Attack Entries - Blueprint setup
Animation Montage
Animation Notifiers
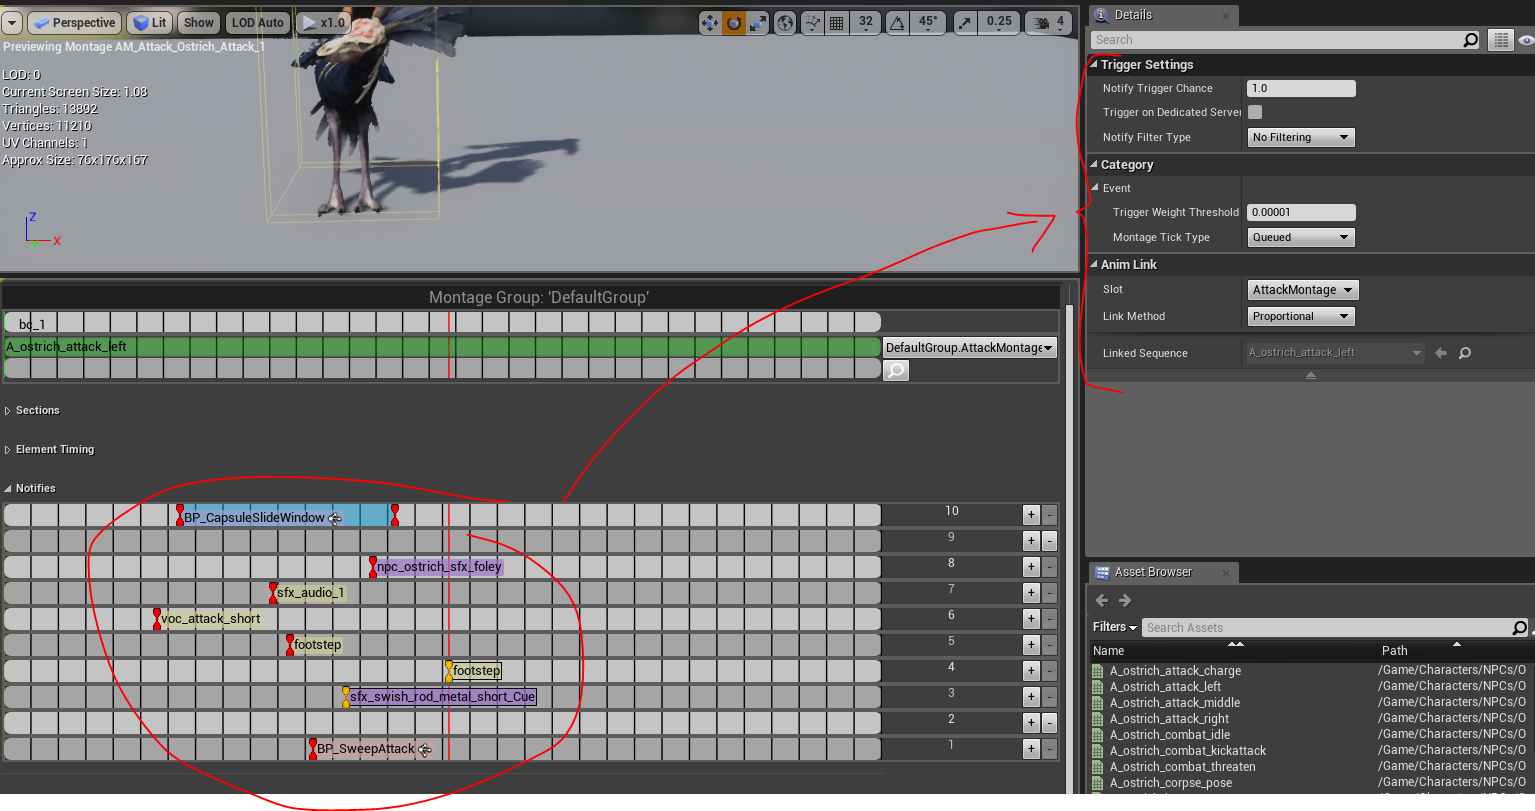
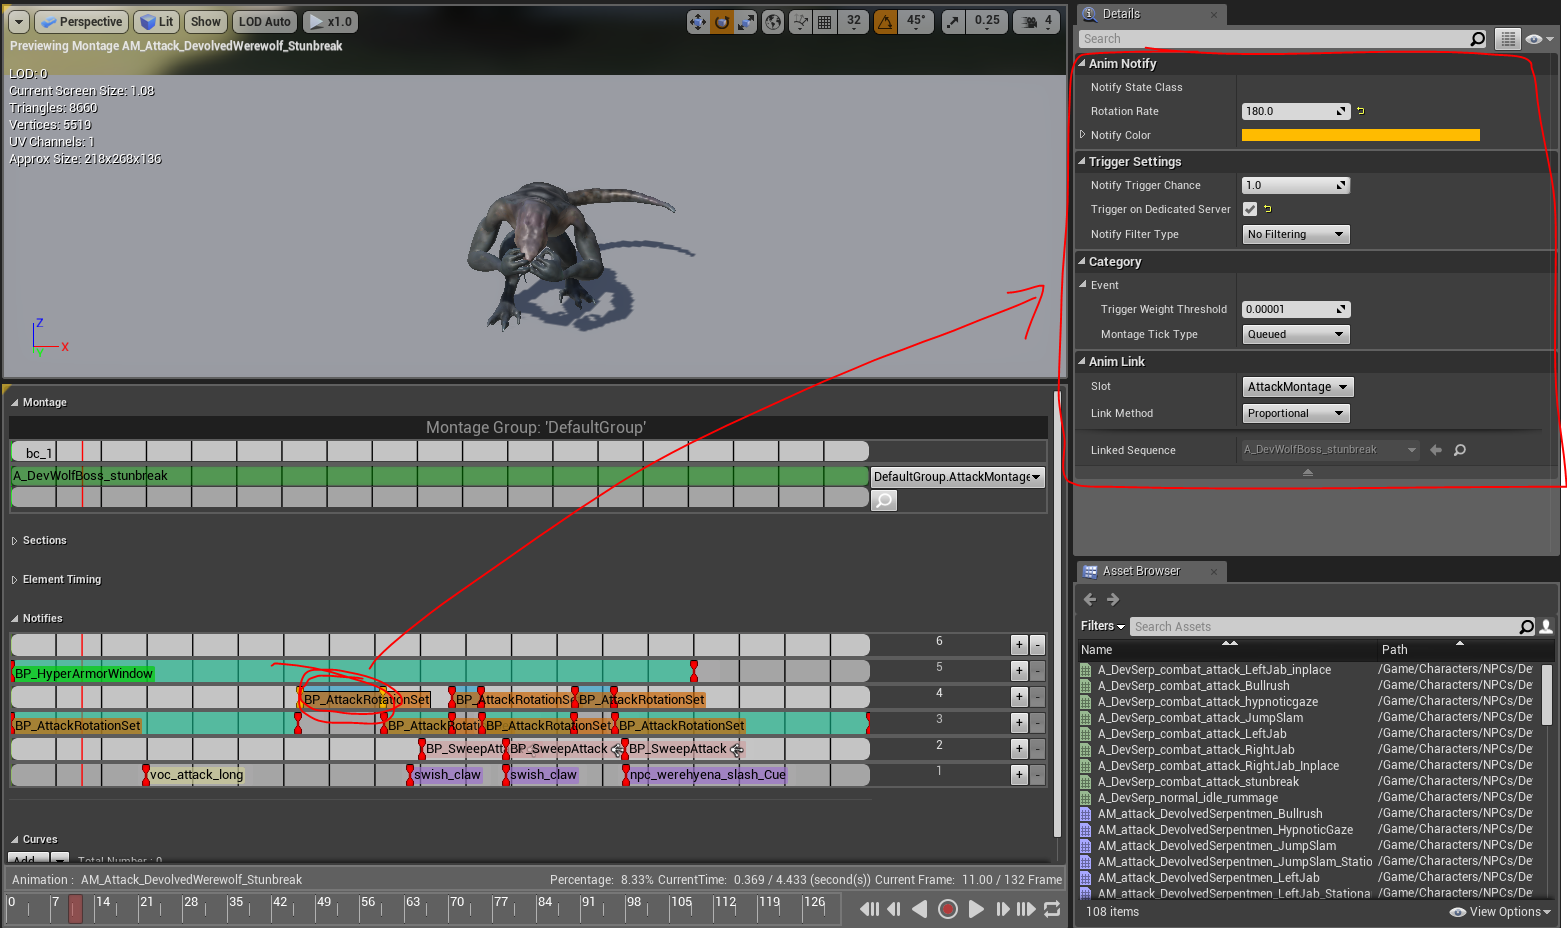
All Animation Montage notifies share a number of default variables. You will find these at the bottom of the Details panel if you select a single notify, or you will see them if you select multiple notifies (it doesn’t matter if it is of the same type or different types).
-
NOTE : If you select multiple notifies, you are not able to mass edit their individual values, but you are able to mass edit the values which they all have by default.
There are three important things to keep in mind for the default variables:
-
Trigger on Dedicated Server - By default it is false. If it is set to true it will also trigger on dedicated server. Notifies that deal damage (Sweep Attack) for instance should always trigger on dedicated server. Things that only are important for the client like particles or audio should not trigger on dedicated.
-
IMPORTANT NOTE : For SweepAttacks and Rotation values, this should be TRUE. In a future release, we will remove this flag for those notifies where it should be TRUE always to make things easier.
-
-
Montage Tick Type - There are two types of Tick Type: Queued means that the notify will be put into a queue and executed in order. If for some reason there is a delay, lag etc, the queue and the animation don’t wait for each other. This is used for things that won’t reduce the gameplay experience if it is desynced. Branching means that as soon as this notify is hit, it will stop here until the notify is triggered. This is for notifies which should always happen when they occur and would cause gameplay issues if they are desynced.
-
Link Method - These are different options of how to link the notify to the animation within the animation montage. This has no gameplay purpose, but if you are tweaking or modifying the speed or length of the animation this is a variable which can be tweaked to get your desired results without having to manually reposition all the notifies.
Animation asset (enable root motion)
Some animations require RootMotion to be enabled. This is done on the animation asset itself (not in the animation montage) and is really the only thing which is done specifically on the animation asset. Other things that can be done would be to attach things like VFX or Audio that will always be shared by all instances that use this animation. I would not recommend this, as more often than expected the same animation is used by another NPC which requires a different visual on the VFX, or it has a significant size adjustment which would make the audio sound different. So in general it is better to have those things in the animation montage (and then dupe the montage when these changes are needed).
What RootMotion does is to sync the NPC rotation and location with the animation root rotation and location. Not all animations need to animate the root, this is done on a case-by-case scenario.
-
NOTE : When an NPC does an attack, it animates the mesh only, so the capsule/NPC blueprint (or whatever you want to call it) will by default be on the same location and in the same rotation while the mesh might be offset and doing all the things the animation tells it to do. If the animation ends while the mesh is offset, it will pop back to idle (on the NPC location and rotation) when the attack is done. Note that the mesh does not have any collision.
-
NOTE : If the root of the animation is not actually animated (this is done by the animator when the animation is created) it will by default face forward throughout the animation. So if the variable is set to true in this scenario, it will not have any noticeable effect.
Ingame examples:
-
XX_ Hyena/Spider normal attack (moves the NPC slightly forward, but no root)
-
XX_ 90 degree turn attack (w and w.o. root)
-
XX_ Spin attack (no root)
Sweep Attack
The sweep attack notify contains most of the data used in an attack. The size of the attack area, knockbacks, interactions with a shield, etc.
The first thing you should do after adding a Sweep attack is to set the Trigger on Dedicated Server to True and the Montage Tick Type to BranchingPoint.
AttackboxCollision and Capsule Size
This defines where the attackbox is spawned and its size.
The first thing that needs to be done is to set the Capsule Half Height . This determines where the Sweep Attack box will spawn. It takes into account if NPCs are of different scales so the same attack can be used even if you have multiple variations that are bigger or smaller.
This value should be the same CapsuleHalfHeight as the NPC (NPC blueprint) if the NPC was at a scale of 1. So for instance if the NPC is at a scale of 1.25 with a capsule half height of 100, that would mean its half height in scale 1 would be 80 (100/1.25=80). If for some reason multiple NPCs use this attack, but their capsule half height at scale 1 is different, that would mean the spawnpoint of the sweep attack box will be offset. So ideally fix the capsule half height of the NPC blueprints instead of creating different attacks which only have the capsule half height variable as a difference.
Use the “ Collision Transform ” to determine the location offset of the attackbox. The “End Collision Transform” should not be used. It does technically work, but on suggestion from the coders it should be ignored and instead the “ Collision Reach ” should be used. CollisionReach extendes the box forward by an amount. So in conjunction with the CollisionTransform you should be able to align this box the way you want it.
-
NOTE : The rotation of the box does not have any impact on the player except if the player is inside it or not (hit or not hit). Knockback direction for instance is determined from the NPCs location and not the attackbox. Also the sweepattackbox only exists for 1 frame (even if the debug visual frame exists longer).
CollisionExtent : Use this to increase the height and width of the box (instead of using scale from the CollisionTransform).
SweepAttackGroups
are for attacks that use a multitude of attackboxes, but the player should only be affected by one of them. Example: A rhino charge attack might have 20 attackboxes that trigger (since they only exist for 1 frame each), but you don’t want the player to potentially get hit by all 20.
So if you give all attacks that belong to a “group” the same number, a player that gets hit by one of these “group attacks” will be immune to subsequent attacks from that group.
ClearAttackGroups is usually checked for the last SweepAttackBox in a specific group. This makes it so a player who is immune (from the description above) will no longer be immune to that group (for the next time that attack is used, or that same group number is used within that attack).
DamageMultipliers
This entire section was what we had available before we added all of the Knockback Class and combo effects below. The most common use for this was to set specific Knockback types and directions for different attacks, but this should be done in the KnockBackClass now (though most attacks in the game at the time of writing this use this system).
Other than that, it can still be used to modify damage values if for instance you have an NPC attack with multiple attackboxes, but some attackboxes should be weaker or stronger than the default damage values (for instance a running charge attack might have an extra “punch” at the end which could have higher damage). In addition, you can do similar things for stamina damage (or damage types in general).
-
NOTE : If you modify damage or anything like that you need to set the DamageType to the correspending damage you are inflicting (HealthDmg for instance). The image below shows some of the most common damage types, but others might exist that use a different naming convention.
Knockback (and knockback direction)
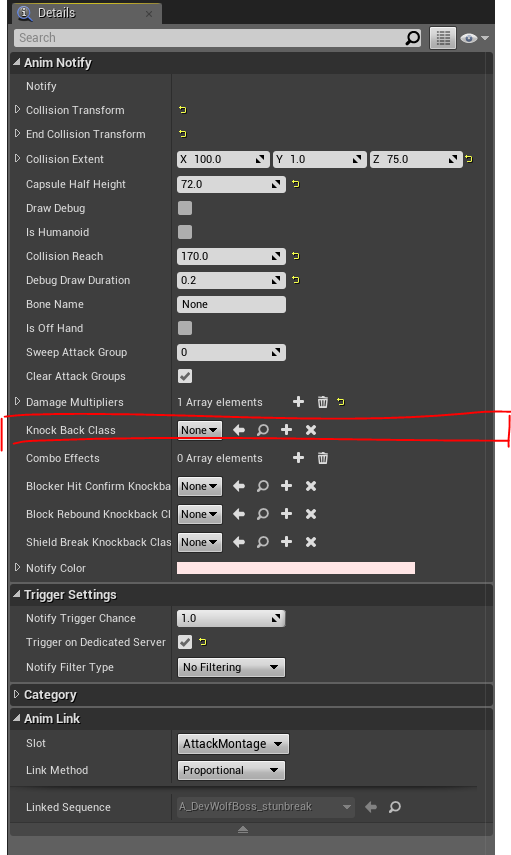
KnockBackClass determines what type of knockback is applied to a character (usually humans as most other NPCs do not have supported knockback animations for falling on the ground, get up, etc) when hit. There are already a number of knockback directions and lengths created, but if more are needed just create new ones by going to a referenced asset and copying.
Knockback direction is determined based on the facing direction of the NPC delivering the attack. So if you want to make the player fly in a specific direction you need to consider it based on the NPC delivering the attack.
-
NOTE : It is important to remember that this is the facing direction of the NPC, NOT the mesh. Look at Animation Asset (enable root motion) for more info on this.
When determining what knockback directions to use (when in doubt), a general rule of thumb is a “delayed” knockback direction based on the animation arc.
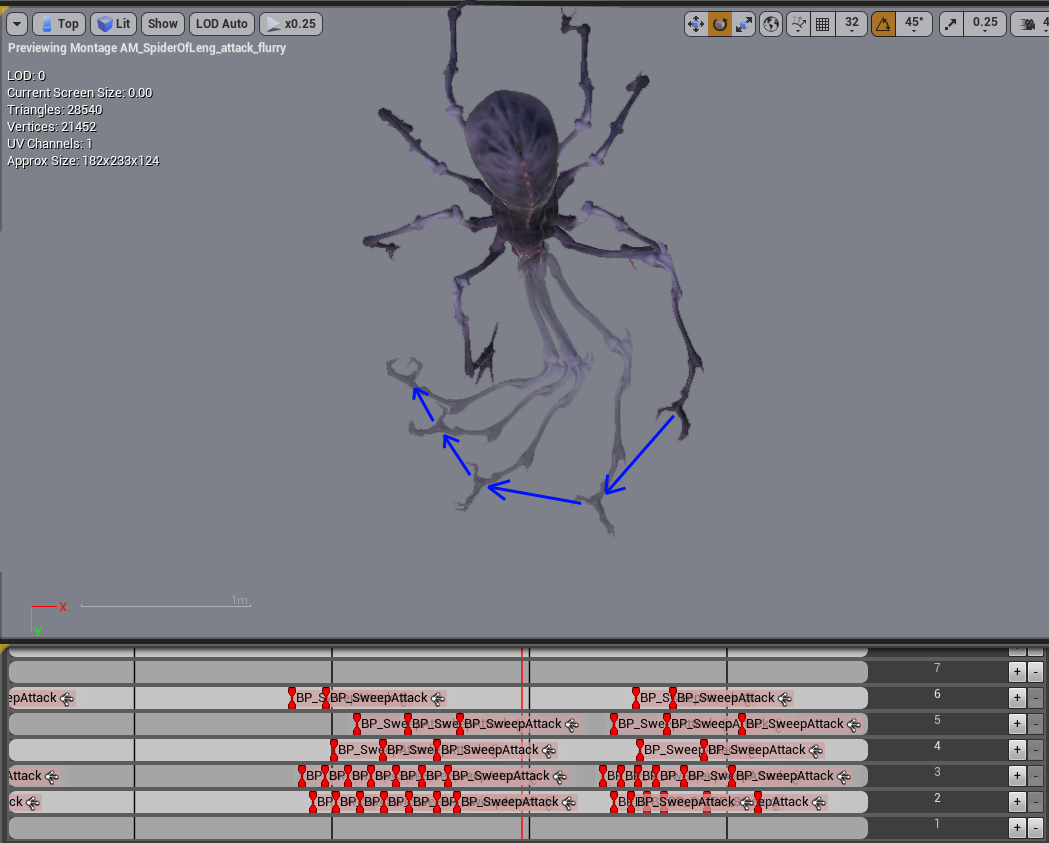
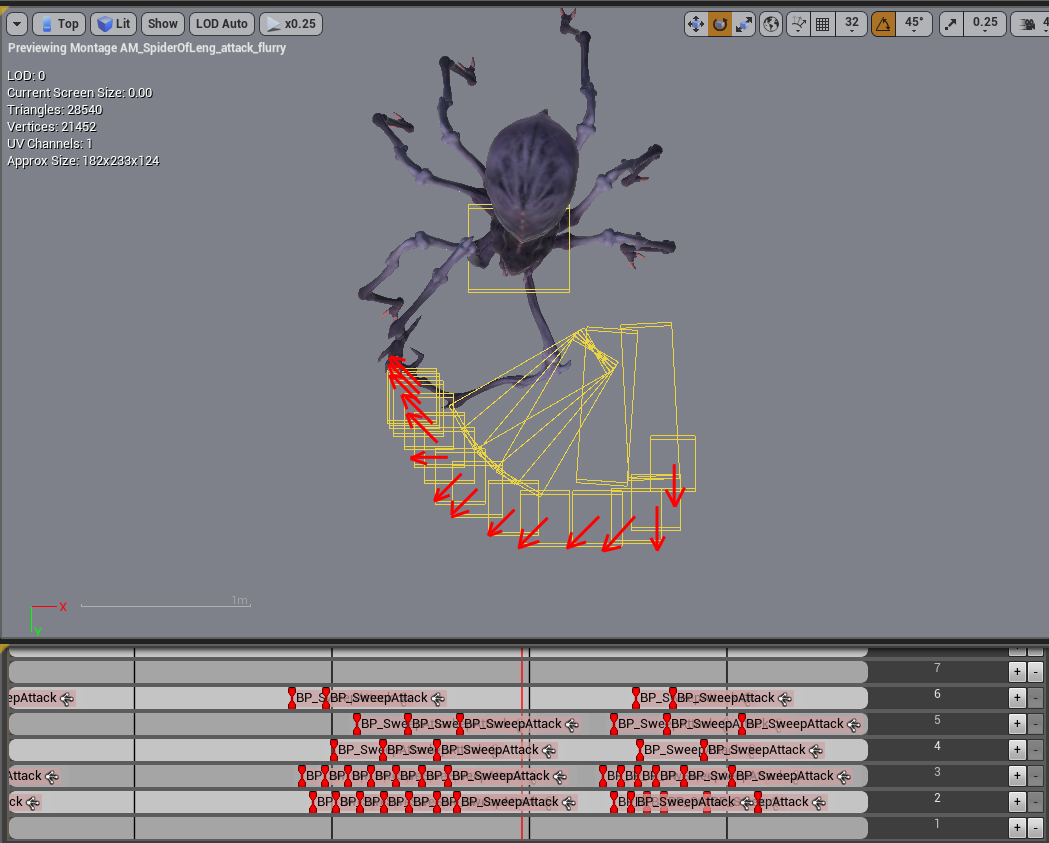
For instance, if the animation has an attack arc like this:
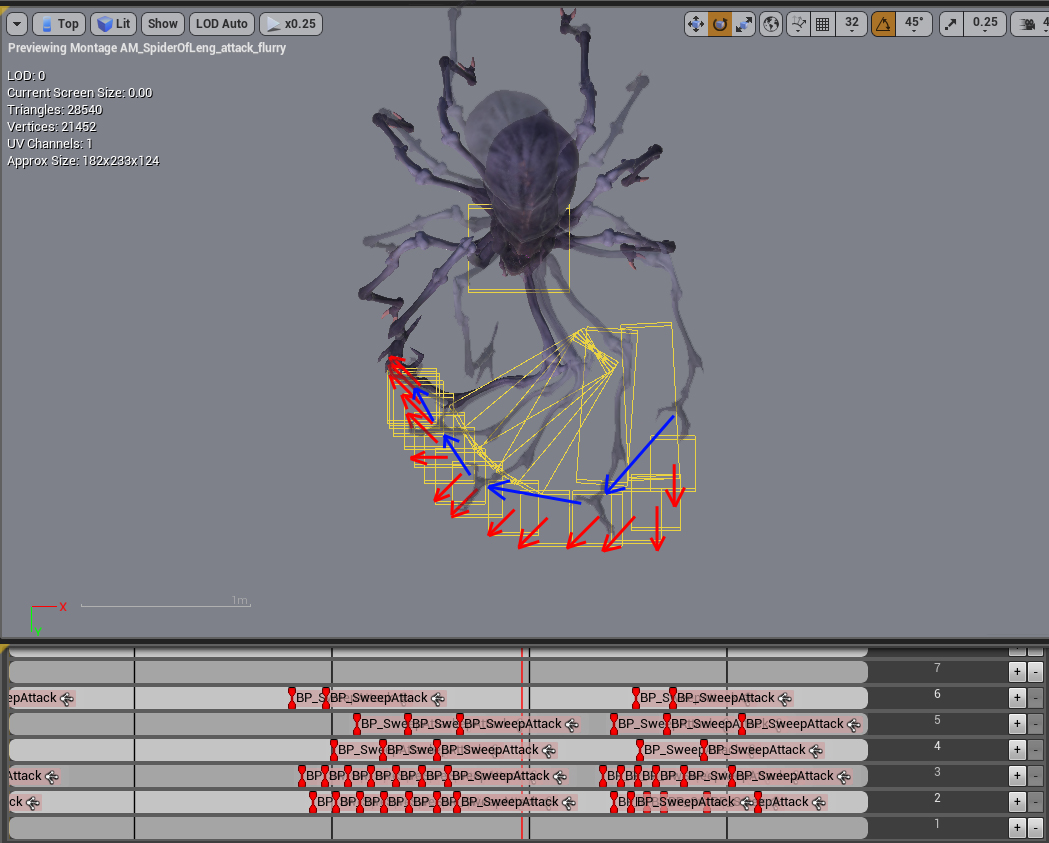
Using knockbacks that have the same directions as the arc feels strange (there is a more scientific explanation for this, but I won’t go into that). So, if you look at the attackboxes and assign delayed knockback directions you get something that looks more like this (only look at the small attackboxes with the arrows):
If we now ovelap the animation arc and the attackbox kb directions:
So as you can see the red arrows align more with the previous direction than the animation arc. This obviously isn’t true for everything, but if you have big swipes that cover a lot of area with a lot of attackboxes, this is a good place to start and you will hit the mark pretty well on the first try.
-
NOTE : Remember to have RootMotionEnabled set correctly in the animation asset before you start adding attackboxes.
The knockbacks that already exist follow a naming convention which might seem reversed depending on how you look at it. It is based on if the player is looking at the NPC instead of what the NPC is looking at.
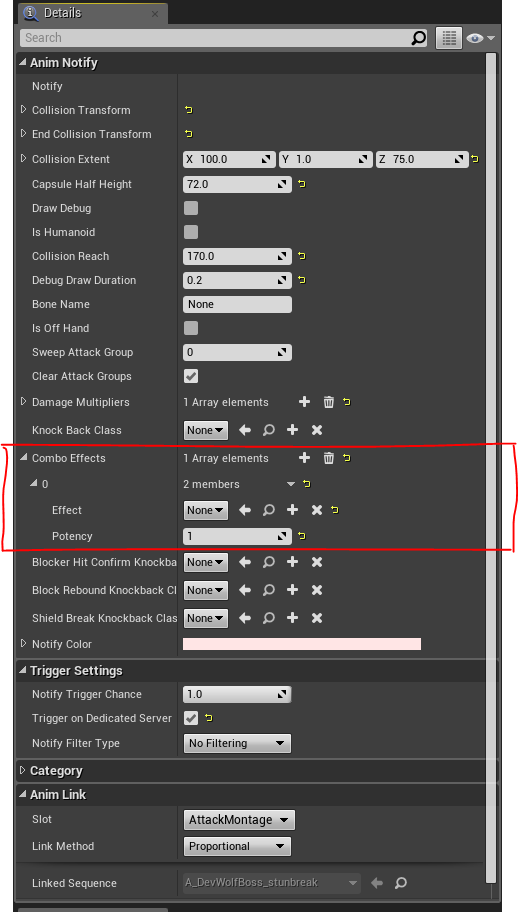
ComboEffects
ComboEffects are primarily used if the attack should apply procs like bleed or sunder. Some NPC attacks have multiple attacks within the same montage and some with different effects. For instance a scorpion might have an attack which consists of right claw into left claw into stinger attack. So in this example you might want only the stinger to apply poison.
Block and Shield animations
If these values are left unmodified, they will default to whatever the default animations are. Both HitConfirm and Rebound animations should be considered when it comes to gameplay vs. that NPC.
Example: Quick/light attacks from NPCs should have little impact on both the attack and blocker, making the result of the exchange be in no ones favor. Heavier attacks on the other hand would either be able to push through the shield and stagger the blocker, or be stopped by the shield and stagger the attacker.
-
BlockerHitConfirmKnockback : The animation that the blocking NPC will play if this attack hits the shield. For instance light attacks like hyena bite usually cause a quick recovery for the blocker, while heavier attacks should cause a longer recovery.
-
BlockReboundKnockbackClass : This is the animation the attacked plays if the attack hits a shield.
-
ShieldBreakKnockbackClass : This is the animation which is played on the blocker if an attack hits the shield, but also “breaks” the block in the process (taking the player to 0 stamina).
Attack Rotation
AttackRotation is used if you want the NPC to be able to rotate during an attack animation. This is a notify with a start and end, so it can be used for parts of the attack or multiple times during the attack to change the amount of rotation allowed at any given time.
Attacks that use rotation should ALWAYS (unless there is a special case) have rotation set to 0 after the last sweep attackbox in the montage. Usually rotation set to 0 should happen at the point in the animation where the NPC commits to its attack and continue to be 0 for the rest of the montage.
This is important so the player can learn about which attacks the NPC does that can be punished, but also it looks kind of buggy if the NPC rotates on the spot while not doing anything.
AttackRotationSet
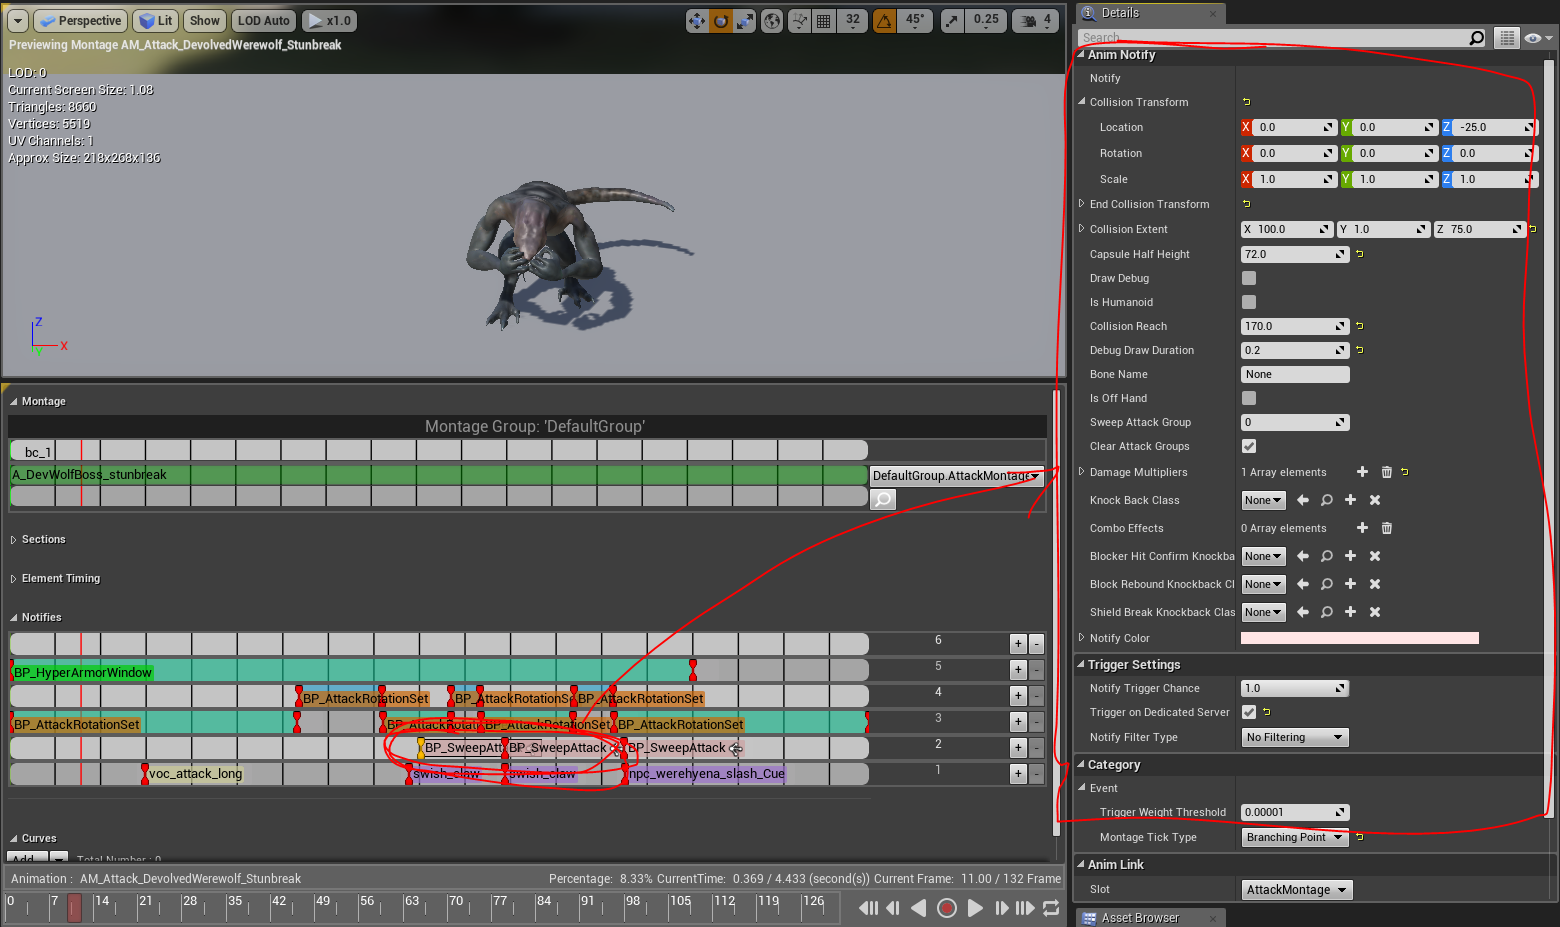
Uses degrees of rotation per second. Some attacks (like the image below) disables and enables rotation during different segments of the animation. This is usually for attacks which have multiple attacks in the animation and has movement in the animation. This is to give the NPC a chance to readjust its direction between each attack (usually the value is in an area where it can track towards a player, but not be able to do major rotation adjustments which would always hit player).
-
NOTE : If multiple segments are used to adjust the rotate rate, make sure that the starts and ends of the different notifies do not overlap each other (make sure the start of a new notify comes after the end of the previous one)
-
NOTE : Attack Rotations are not set on Mounted attacks - the isRiding bool overrides this check and allows rotations for those.
-
DEPRICATED: RotationRateModificationNotifyState
-
Use AttackRotationSet instead
-
Hyper Armor
During this notify window the NPC will ignore knockbacks while still taking damage as normal.
This is used for multiple things, but very often it is a case by case thing depending on the NPC that uses it the nature of the animation.
-
NOTE : If an attack has a lot of motion like jumping, flight, burrow, rotation (while not using root motion) hyper armor should probably be used for these parts. Otherwise if the NPC is hit by an attack with knockback, the NPC will abort the attack anim and do the knockback animation instead. This can often look bad as it will pop from the big motion in the attack animation into the knockback animation (there is no blend between these).
CapsuleSlideWindow
This window is used to force the character to stop if it hits another capsule. The name of the notify might be a bit misleading, but it will prevent the NPC from sliding past a capsule if it hits it (even though the name makes it sound like it allows it).
Something to keep in mind, is that this was made for humans when we implemented the Combosystem. Non-human NPCs have a tendency to already stop when it hits another capsule, so the different types probably behave slightly differently by default since this has little to no effect on non-humans.
Projectile Attack
This notify will trigger the projectile being shot. See own section below for full description as the montage doesn’t do anything more than the trigger of it being fired.
NOTE : There is a small delay from when the projectile notify triggers and when the actual projectile is actually fired. Therefore, add the notify trigger a bit before you want to see it fire from the NPC.
Projectile attacks
Blueprint
Projectile attacks are set up in a simlar way to non-projectile attacks, with some exceptions. The main difference is that this type of attack spawns a projectile which flies through the air and hits on its own. This is often referred to as the “Launcher” and the “Projectile”.
The launcher/weapon blueprint uses a different parent than than melee weapons (see image below). The information within this blueprint is more or less the same as for melee weapons (see above for more information).
This blueprint or attack is capable of launching any projectile in the game (what projectile to use is referenced in the item table).
A new projectile requires its own blueprint (see below for parent reference). This blueprint is for the actual projectile that flies through the air (mesh, particles, speed, falloff, etc).
Animation Montage
The animation montage is similar to normal attacks, except that it uses ProjectileAttack instead of SweepAttack notify.
NOTE : When the projectile is fired, it will always be fired towards the target regardless of the rotation of the NPC firing it. Using rotation adjustments in the animation montage will not have an impact except for the visuals of the NPC rotating. Usually projectiles are fired from a distance, so having full rotation doesn’t look weird (as the player isn’t able to make the NPC rotate a lot in a small amount of time). If the NPC uses ranged attacks in melee, you might want to consider adding some rotation tweaks if the mesh looks really strange when sliding around in the “shooting pose”, as long as attack still looks okay. This again is purely for what looks best and has no real impact on timing for the player.
Weapon Blueprints
Weapon blueprints are in short used to reference what animation montages are used for that weapon and where the weapon is equipped (socket on NPC skeleton). There is a slight difference for humans and non-humans so those will be mentioned separately.
Human weapon blueprints are for the most part already created and therefore won’t require a lot of editing or new entries. Each weapon blueprint is created per weapon type and the majority of the data is added by the animator.
-
WeaponComboType : If the weapon uses ComboTable attack information this is added here. Most human weapons do use ComboTable entries because they are player weapons, and therefore need to blend from between button inputs. More information about ComboTable entries and setup is found below. In short these type of attacks are attacks that chain into each other (blend) and therefore doesn’t have its attack information in the AnimationPackage field below.
-
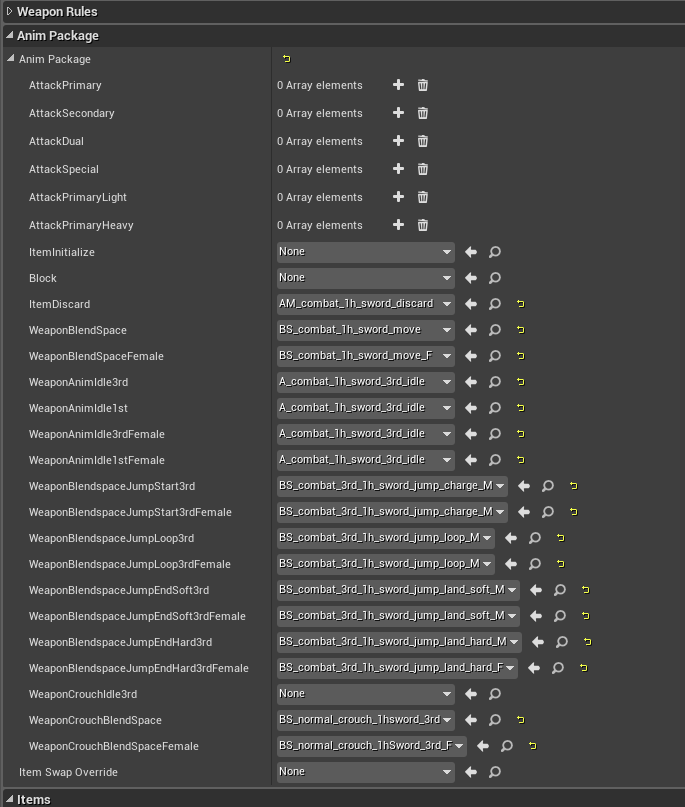
AnimationPackage : This section has a lot of entries for various types of animations. For humans this is used to add all types of animation which override their already existing animations found in its base AnimationBlueprint (a blueprint which controls all base animations of a character like movement, idle, crouching, jumping, etc). This data is usually added by the animator, but since they are only added once per weapon type (sword, axe, spear, bow, etc) they aren’t modified that often.
-
EquipSocketName : This is the socket which the character equips the weapon. For humans, “Socket_Main” is used for most weapons. Again this is usually only set once per weapon type also.
Idle anims during roaming
NPCs that roam can use idle variations to make them blend better with the environment. When an NPC is roaming and chooses a new location to go to there is a chance that it will choose to do an idle variation first (if it has any available).
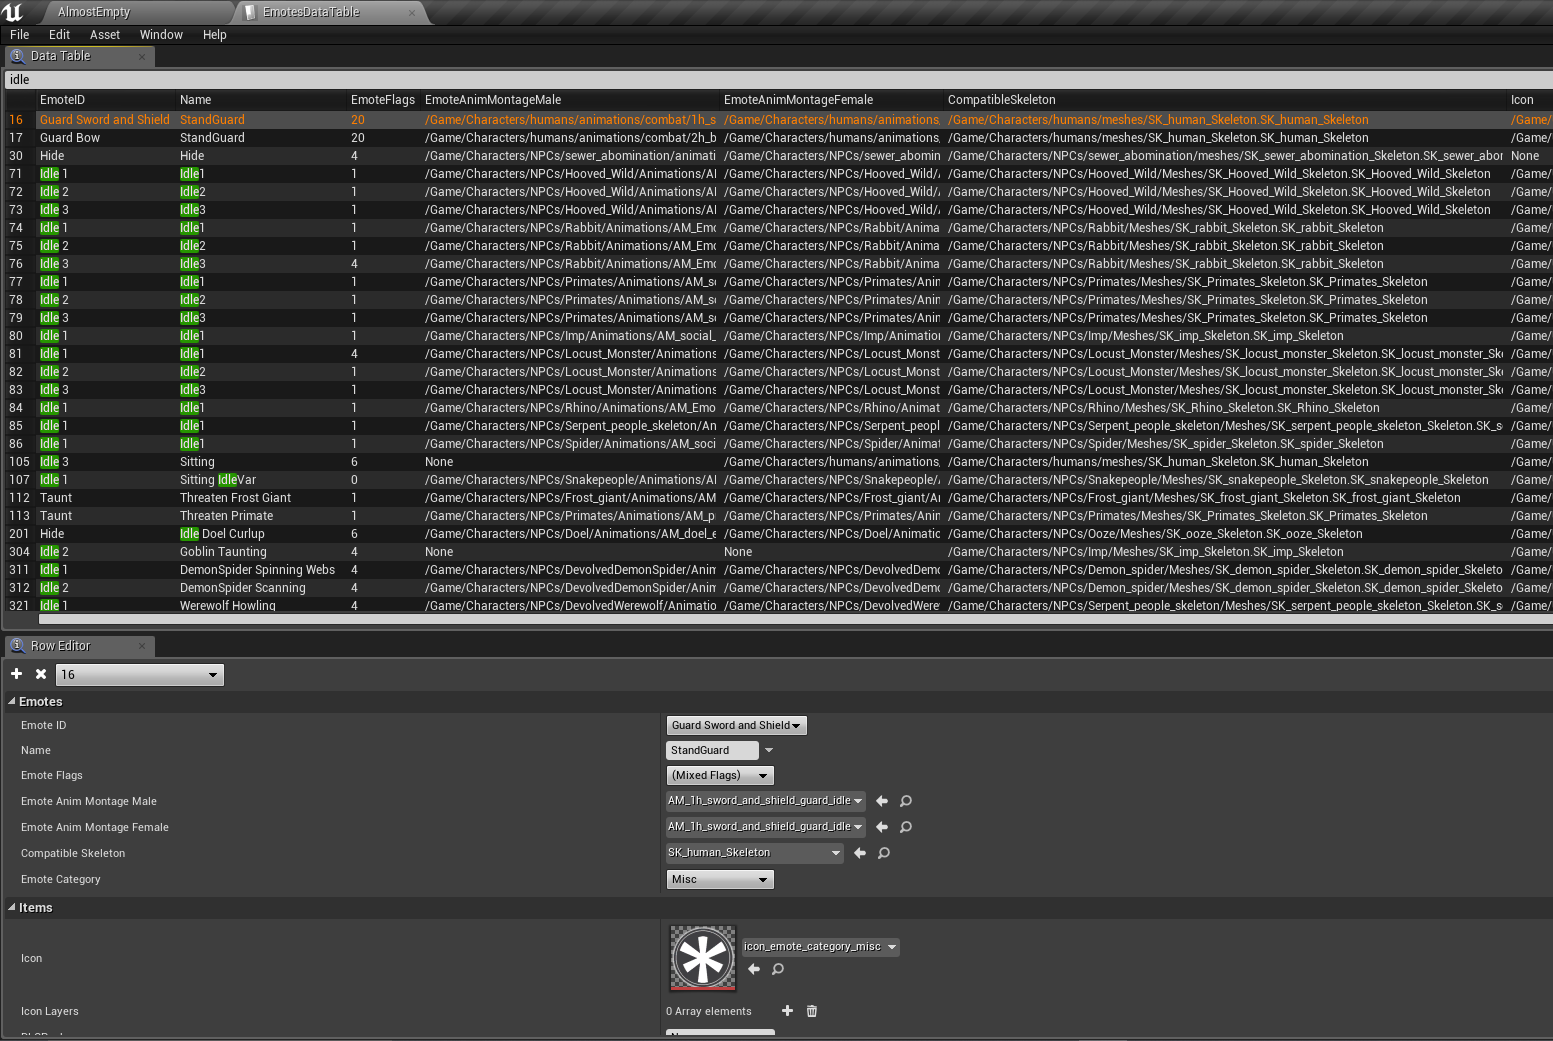
When choosing an Idle variation it will look in the EmotesDataTable (image below) and search through the CompatibleSkeleton column to find all entries matching with its own skeleton. Then it will look through the EmoteCategory or EmoteID for “Idle” and choose a random entry which matches both of these criteria (male and female options are only used for humans).
Keep in mind when adding new entries that this system uses the skeleton and a number of NPCs in many cases share the same skeleton while being very different. So when requesting animations, keep this in mind so the different NPCs can use the same anims (Shaleback - Gorilla - RocknoseKing for instance).
