Living Settlements or, more accurately, AI Needs allow NPCs to have assigned Needs which deplete over time (or in response to outside influence). When passive, the NPC will prioritize their current needs and attempt to fulfill them with nearby Smart Objects.
It is important to state that Needs are not exclusive to Living Settlements. The system is designed to be incredibly flexible and powerful, and can be used for a great number of purposes. Needs could even be applied to players for gameplay purposes, or put on enemies as a creative way of driving dynamic combat behaviors.
Overview
AI Needs are made up of three primary parts, the AI Needs Component , the Needs themselves, and Need Fulfilling Smart Objects .
The AI Needs Component is automatically added to all thralls when they spawn, but can be manually added to any other NPC, including enemies and wildlife. This component keeps track of the NPC’s current needs, updating their values, calculating their current priority, and providing the most important current need when requested.
Needs themselves are structs that provide all of the information necessary for the AI Needs Component to construct and begin tracking a need. They contain information such as:
-
Minimum and maximum value
-
How the need changes (depleting or filling) passively per second
-
How important the need is overall
-
Whether the importance of the need is affected by other factors (such as time of day)
-
Buffs/debuffs to apply to the NPC when the need is within a particular range
-
What Smart Objects to look for in order to fulfill this need.
Lastly,
Need Fulfilling Smart Objects
are
Smart Objects
(also see “
Using the Smart Object System
”) with slots that have been given the
AffectNeed
Smart Object Function
(
SOF_AffectNeed
) and given tags matching a particular need. The amount and types of fulfillment are configured in a “
NeedFulfillments
” data table and then referenced in the AffectNeed SOF.
While it may seem complicated, creating and modifying needs is relatively easy.
Needs
Basic Functionality
A need at its core is very simple, made up of a Minimum value, Maximum value, Current Value, Passive Gain/Loss per minute. The AI Needs Component loops through its list of needs and updates their Current Value based on the Gain/Loss per minute.
On top of its value, Needs also provide instructions on how to fulfill the need as well as instructions on how to calculate its importance when prioritizing it against other needs. For example, a need might say “You can fulfill me by laying in a bed, and when I’m below 15% full OR its between the hours of midnight and 5 A.M., I am twice as important as normal.”
Upon request, the AI Needs Component will calculate the importance of all current needs and select the most important one, allowing the NPC’s Behavior Tree to fulfilling it using the instructions provided in the Need.
Need Suspension and Satisfaction
If the NPC’s behavior is unable to fulfill a need using the given instructions (there are no beds anywhere!) it can be suspended for a time, which prevents it from being selected as the most important need until unsuspended.
Similarly, you can provide a value range that is considered “Satisfied”, which will prevent the Need from being considered for most important unless all other needs are also satisfied.
Creating and Modifying Needs
Needs are structs of information dictating how the AI Needs Component should construct and manage the need over time as well as how its importance should be calculated and prioritized with others.
While new needs can be constructed and added to a character at runtime via Blueprint (covered later), the easiest and most common way of making a need is simply by adding it to the
Needs Table
(
/Game/Systems/AI/Settlement/Needs/NeedsTable
).
There are a staggering number of options available to configure which will be detailed later in this document, this section will simply cover those that are required or most common.
Need Properties (basic)
One Important Note before jumping in:
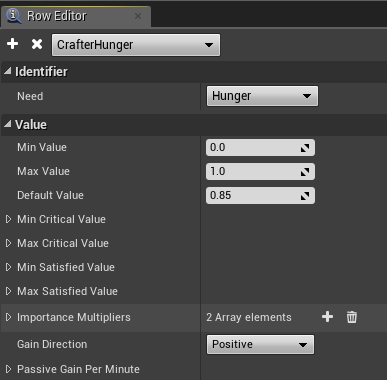
Many of the configurable properties in the Needs Table make use of Curvable Float variables and provide a list of confusing-sounding options. Don’t Panic! Simply fill out the “Value” option (shown in the picture to the right) and leave the other fields as-is. The other fields are optional and will be discussed later in this document.
-
Identifier - This Enum is used when referencing needs from blueprint. If you want to find the value of a character’s Work need, but don’t know which of the many different “work” needs they use, you find it using the Work identifier.
-
Multiple needs use the same Identifier (such as
Work_PriestandWork_Carpenter), but a character can only have one need per Identifier at any time. -
New Identifiers can be created by adding rows to the NeedsEnumTable (
/Game/Systems/AI/Settlement/Needs/NeedsEnumTable).
-
-
Min/Max Value - These define the maximum range of the need’s “meter”.
Pro-Tip : While min/max values of 0-1 were used internally at Funcom, I regret this decision as it made tweaking fulfillment amounts very frustrating (tiny decimals are difficult to visualize). I suggest arbitrarily wider ranges such as 0-20 or 0-100.
-
Default Value - This is the value the need will start at when initially added to a character or when restarting the game/server if the character is not persistent (Thralls are persistent).
-
Min/Max Critical Value - These provide a range at which this Need should be considered “Critical.”
-
When the AI Needs Component is prioritizing needs and deciding the most important, if any needs are critical, all non-critical needs are ignored completely.
-
This behavior can be disabled by providing an impossible range outside of the Min/Max values.
-
-
Min/Max Satisfied Value - These provide a range at which a need is considered “Satisfied.”
-
When the AI Needs Component is prioritizing needs and deciding the most important, Satisfied needs will only be considered if all other needs are satisfied as well.
-
This behavior can be disabled by providing an impossible range outside of the Min/Max values.
-
-
Importance Multipliers - This is a list of multipliers that determine the importance of this Need relative to others.
-
A single multiplier with a value of 2 will be considered twice as important than a need with a single multiplier with a flat value of 1.
-
Curves with contexts can be applied to make the importance fluctuate based on a variety of factors, such as player health or how full/empty the need currently is. These options will be covered later in this document.
-
-
Gain Direction - Which direction (positive/negative) moving the value in is considered “good”, used when prioritizing needs and selecting the most important. This allows for needs that fill over time rather than deplete, and for which being “full” is considered undesirable (boredom, bloodlust, etc.)
-
Passive Gain/Loss per Minute - These values dictate how much the need fills or depletes naturally over time. While typically desirable, these fields are optional. You may for example want a need that only changes due to external input (such as fear, arousal, etc.)
-
Effects - Effects are used to specify a range in which the character should be affected in some way, most notably Buffs and Debuffs.
-
For example, an Effect at the lowest ranges of a Hunger need might apply the “starving” debuff, while an effect at the highest ranges might apply a “well fed” buff.
-
There are many powerful things effects can do, further information will be provided elsewhere in this document.
-
-
Fulfilment Behavior Tree - In place of Need-Fulfilling Smart Objects , custom Behavior Trees can instead be assigned to fulfill a particular need, though this may require additional work to implement.
-
This use case is still relatively untested internally at Funcom.
-
Use of this option will be covered elsewhere in the document.
-
-
EQS Fulfillment Query - This is the Environmental Query the NPC will perform to search for Smart Objects which can fulfill this need, IE “Look within 25 meters for unoccupied chairs”. More information provided later in this document.
Adding Needs to Characters
Needs can be added to Thralls in two primary ways:
-
By default, using Need Profiles which apply to all characters of a particular Profession .
-
In Blueprint, directly adding a new Need or Need Profile to their component at runtime.
To add a need to an NPC they must first have an AI Needs Component . All Thralls/followers are automatically given one as they spawn. If you want to add needs to a non-thrall character, refer to the section on adding needs components further in this document.
Need Profiles
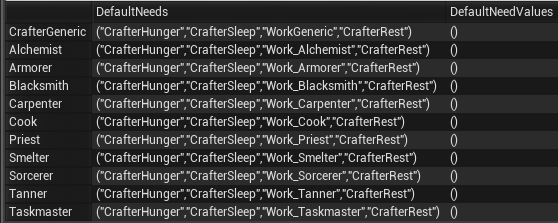
Needs are grouped together into
Need Profiles
using the
NeedsProfileTable
(
/Game/Systems/AI/Settlement/Needs/NeedsProfileTable
). Add your new need to any of these existing profiles or create your own new profile.
Need Profiles are assigned to characters by their Profession , using the ProfessionTemplateDataTable (/Game/Systems/SpawnTable/ProfessionTemplateDataTable). Simply find the profession you wish to edit and add the row name of your profile to the NeedsProfile field.
Adding Needs during Runtime
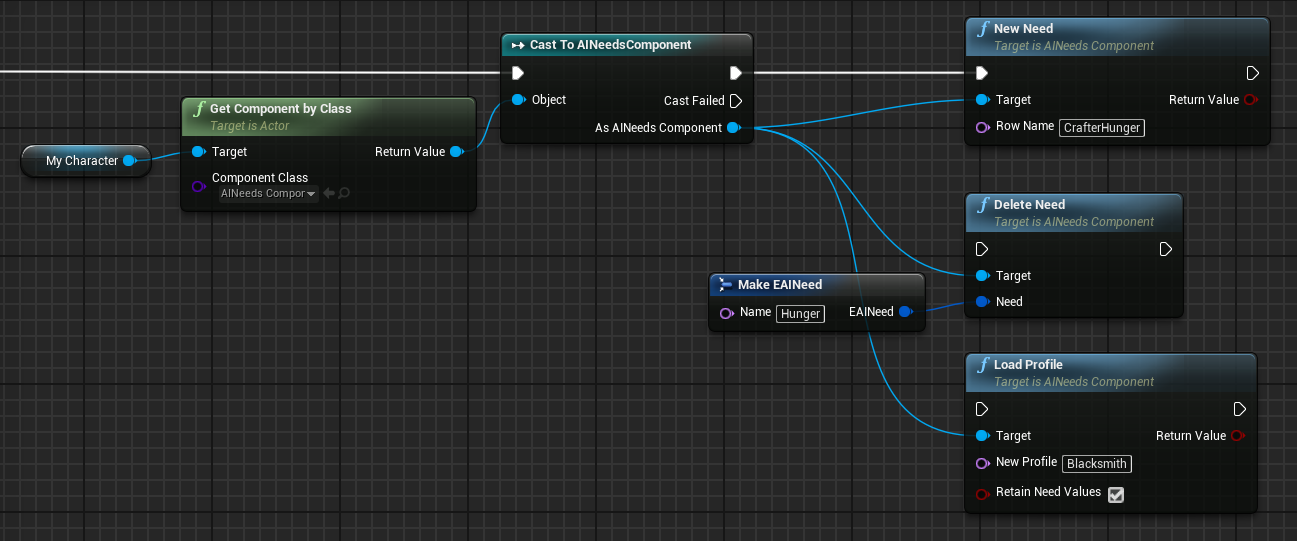
After getting a reference to your chosen character’s
AINeedsComponent
, several functions allow you to
AddNeed
,
DeleteNeed
, and
LoadProfile
, as shown in the image below:
Note that:
-
Add Need takes the row name of the need from the Needs Table .
-
Delete Need takes the Identifier , in the form of an
EAINeedvariable.-
You can use the “Make EAINeed” node and simply type the Identifier as text to provide this input.
-
-
LoadProfile takes the name of the profile from the Needs Profile Table .
Fulfilling Needs
The fulfillment of needs is done primarily through the use of Smart Objects, but can also be done with custom Behavior Trees.
Although separate from the concept of “fulfillment”, you can also affect need values from any blueprint. This allows a lot of creative interaction, such as a Potion which provides a full nights sleep or a spell that makes characters feel very hungry.
Need-Fulfilling Smart Objects
This guide does not cover the creation of Smart Objects or Placeables. For guides to creating and working with Smart Objects, see:
Fulfillment Slot Function
For a Smart Object Slot to fulfill a need, it simply needs to include
SOF_AffectNeed
as one of the Smart Object Functions. In the properties of that function, you will need to specify a
Fulfillment Template.
In addition, NPC’s will need to be able to search for your smart object. The way to allow this is to put a relevant tag into the Smart Object Slot’s “Slot Type” tags. There is already a category for Needs (SmartObject.Needs.____), so adding/using new tags underneath that category is recommended.
Need Fulfillment Templates
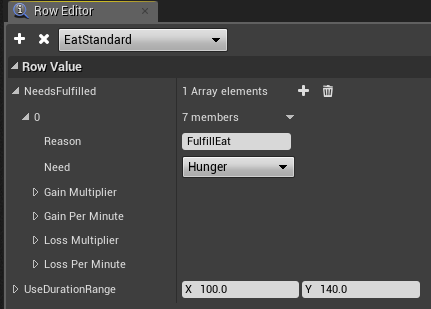
To add or modify Fulfillment Templates, open the
NeedFulfillmentsTable
(
/Game/Systems/AI/Settlement/Needs/NeedFulfillmentsTable
).
For each Fulfillment Template , you can specify:
-
Needs Fulfilled - This is a list of any number of fulfillments, each one contains:
-
Reason - This is text that you can set arbitrarily, it is used to differentiate sources of fulfillment when adding/removing them in the AI Needs Component.
-
Need - The Identifier for the Need you want to fulfill.
-
Gain/Loss Per Minute - This will add or remove the specified amount from the chosen Need every minute. Note that this does not override or replace the Need’s standard passive gain/loss per minute.
-
Gain/Loss Multipliers - These are multipliers that will affect the rate of the Need’s existing passive gain/loss per minute. It is recommended to set the loss multiplier to 0 , so that while using this fulfillment, the need doesn’t continue to deplete (IE, characters shouldn’t get sleepy while they sleep).
-
-
Use Duration Range - This is the minimum and maximum amount of time (in seconds) that an NPC should decide to use this Smart Object before moving on to something else.
Finding the Smart Objects
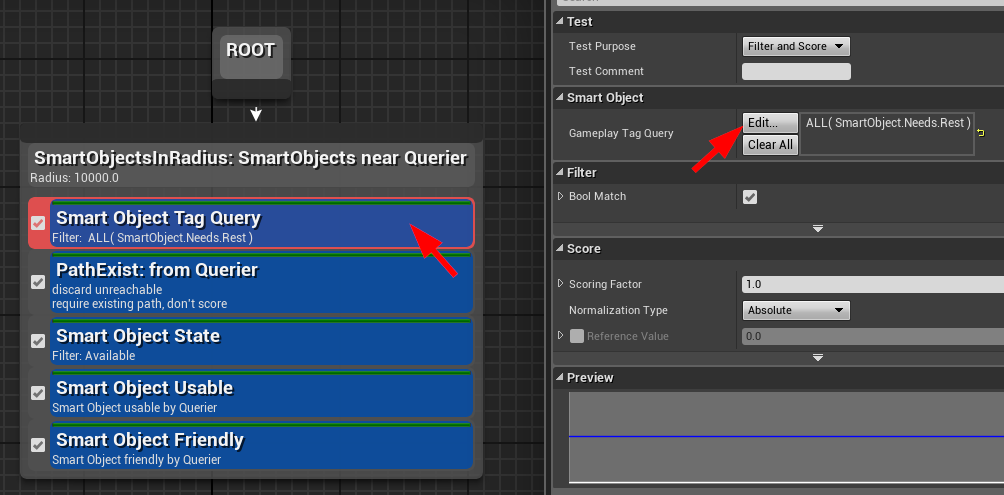
In order to find the smart objects, the Need which you wish to fulfill will run an Environment Query, which Environment Query it uses is defined in the need itself (In the NeedsTable ).
If you are unfamiliar with EQS, don’t panic. You can create new Queries for your needs easily by duplicating one of the other existing Need Environment Queries and simply changing the tags it searches for to match your new Smart Objects, as shown in the image below:
Behavior Tree Requirements
It is important to note that, in order for your NPC to begin fulfilling needs using Smart Objects, they will need to be either:
-
Using the BT_SimpleAttack behavior tree (this is standard for nearly all NPC’s in the game)
-
Using a custom behavior tree which routes them to run “BT_SettlementAgent” when they have Needs and you want them to Fulfill them
-
Using completely custom Need Fulfillment behaviors
Note that if you are using custom behavior trees, the SOF_AffectNeed Smart Object Function uses specific blackboard entries for controlling the time to use the slot. You will need to replicate these entries to your Blackboard or edit SOF_AffectNeed to use your custom BT/BB.
Need-Fulfilling Behavior Trees
If you would like your Need to be fulfilled by a custom behavior, rather than a nearby Smart Object, be aware of a few requirements:
-
If your character is not using BT_SimpleAttack for their behavior tree, you will need to implement a Run Behavior Dynamic task into your behavior to hold the fulfillment behavior.
-
Whatever custom behavior you use will need to handle the actual modification of the Need directly in blueprint, likely in a new BT Task.
-
Modifying needs, including “filling” them, is covered elsewhere in this doc.
-
Dynamic Subtrees and Tag Injection
Run Behavior Dynamic tasks in Behavior Trees are like regular Run Behavior tasks, but allow you to swap out the subtree that the task runs. When changing a subtree, matching tags are used to determine which Run Behavior Dynamic task you wish to edit.
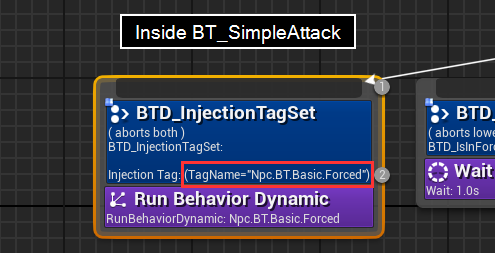
BT_SimpleAttack is used by default for nearly every combat-enabled NPC in the game, and it already provides a very handy
Run Behavior Dynamic
node which has the highest possible priority and only runs if the subtree has been set. The injection tag for this node is
Npc.BT.Basic.Forced
.
Using Need Fulfilling Behavior Trees with BT_SimpleAttack
Because of the node discussed in the section above, to use custom Behavior Trees with BT_SimpleAttack, you simply need to specify your custom BT in the NeedsTable entry for your need, with the injection tag set to
Npc.BT.Basic.Forced
, like so:
Alternatively, using the tag
Npc.BT.Basic.Passive
will replace their passive behavior , allowing them to engage in combat or following the player, only returning to the custom behavior when these do not take priority.
Completing Custom Fulfillment Behaviors
The overridden subtree will remain active until a different need is set to the “Currently Fulfilling Need”, this can be accomplished in several ways:
-
In your custom Behavior Tree by using the “UpdateNeeds” task
-
Forcing the overridden tree to return to default from blueprint, using the “Reset Behavior Subtrees By Tag” node. (not recommended).
-
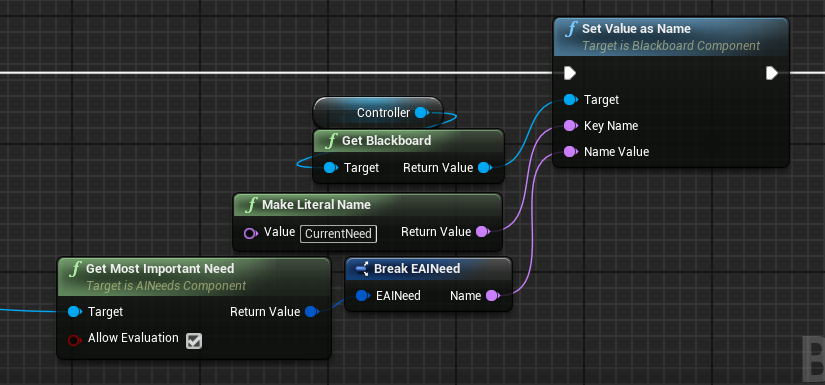
From Blueprint, by getting a reference to the character’s AI Needs Component and calling “Get Most Important Need” followed by “Set Fulfilling Need”, then lastly updating the Blackboard value for “CurrentNeed”:
Interacting with the AI Needs Component
Should you want to add/remove/view/modify Needs as they are actively running on a Character, the AI Needs Component provides a number of useful tools.
Needs Component Functions
-
Get Need - Retrieve the requested need as a “CurrentNeed” structure, which provides all relevant information about its current status.
-
Get Need List - Retrieve a list of all current needs on the NPC, in order of current importance.
-
Get Need Max - Retrieve the maximum value a Need can reach
-
Get Need Value - Retrieve the current value of a Need
-
Get Need Value Ratio - Retrieve the current “fullness” of a need, where 0 = empty and 1 = full.
-
Get Most Important Need - Prioritize the needs and retrieve the one that is currently most important
-
Set Fulfilling Need - Set the need that is currently being fulfilled (note that this only affects the Needs Component, it will not automatically update the characters Behavior).
-
Get Currently Fulfilling Need - Retrieve the need that is currently being fulfilled, if any.
-
New Need - Add a new need to the Characters list of needs.
-
Delete Need - Remove an active need from the character’s list of needs.
-
Set Need Value - Manually set the current level of a need directly.
-
Suspend/Unsuspend Need - Prevent a need from being considered when prioritizing needs and selecting the most important.
-
Start Need Cooldown - Suspend a need (as if you called Suspend Need) and automatically unsuspend it after the provided amount of time has passed.
-
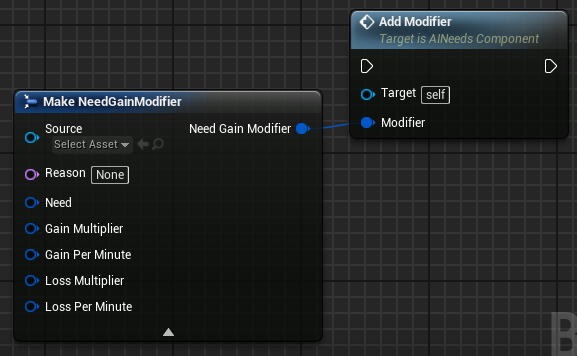
Add/Remove Modifier - Add or remove a Need Modifier, which can temporarily alter the passive gain/loss of need amounts.
Need Modifiers
Need modifiers allow you to temporarily change the passive gain/loss of a specific need. The can come from multiple sources, so when adding a modifier you can provide a “reason” in text that will be used to differentiate the source. You can also (optionally) provide an object as the source, also used for tracking purposes and only important if multiple sources may have the same “reason”.
Modifier Properties:
-
Source - Optional. If calling from an enemy, item, buff, etc, provide a reference to the object you are calling from.
-
Reason - This is text that you can set arbitrarily, it is used to differentiate sources of modification when adding/removing them in the AI Needs Component.
-
Need - The Identifier for the Need you want to modify.
-
Gain/Loss Per Minute - This will add or remove the specified amount from the chosen Need every minute. Note that this does not override or replace the Need’s standard passive gain/loss per minute.
-
Gain/Loss Multipliers - These are multipliers that will affect the rate of the Need’s existing passive gain/loss per minute. Setting either one to zero will prevent gain/loss in that direction regardless of any other modifiers.
Debugging Console Commands
For the sake of visualizing and debugging the needs system, a number of debug commands have been provided.
|
Command |
Notes |
|---|---|
|
NPCDebugWindows show true
|
Enable NPC Debug Windows, then enable the visual needs meters.
|
|
FollowerNeeds |
Lists the active follower’s needs to console *NOTE: This command only works for the thrall that is actively following you, not thrall you may be looking at. |
|
FollowerSetNeed [ NeedName ][ [ Value ] |
Set the active follower’s need to new value. Example Need names: Hunger, Sleep, Work, Rest Values are in decimal, with a range of 0 to 1 (and 0.5 being the middle value) Examples:
Fill up the work need:
Set hunger to mostly filled:
*Note: It can take about 3 minutes for these changes to take effect with the Thrall |
|
FollowerAddNeed [ RowName ] |
Add a need meter to the active follower. Rows are named in the editor’s data table, NeedsTable Examples are: CrafterHunger, CrafterSleep, Work_Cook, Work_Smelter |
|
FollowerDeleteNeed [ NeedName ] |
Removes a need meter from the active follower’s needs list.
Example:
|
|
FollowerLoadNeedProfile [ Profile ] |
Load a new profile into the active follower Profiles contain a pre-defined list of needs. Such as, the profile Tanner contains the general needs of Sleep and Hunger, but also Tanner specific needs Work_Tanner. |
